Tutorial: Set up a project for issue triage
DETAILS: Tier: Free, Premium, Ultimate Offering: GitLab.com, Self-managed, GitLab Dedicated
Issue triage is the process of categorization according to type and severity. As your project grows and people create more issues, it's worth creating a workflow for how you'll triage incoming issues.
In this tutorial, you'll learn how to set up a GitLab project for this.
To set up GitLab for issue triage in a project:
- Create a project
- Decide on the criteria for types, severity, and priority
- Document your criteria
- Create scoped labels
- Prioritize the new labels
- Create an issue triage board
- Create issues for features
Before you begin
- If you're using an existing project for this tutorial, make sure you have at least the Reporter role for the project.
- If you follow the steps below and later decide to create a parent group for your project, to make best use of labels, you'll have to promote the project labels to group labels. Consider creating a group first.
Create a project
A project contains the issues that are used for planning your upcoming code changes.
If you already have a project you're working in, proceed to Decide on the criteria for types, severity, and priority.
To create a blank project:
- On the left sidebar, at the top, select Create new ({plus}) and New project/repository.
- Select Create blank project.
- Enter the project details.
- For Project name, enter
Issue triage tutorial.
- For Project name, enter
- Select Create project.
Decide on the criteria for types, severity, and priority
Next, you'll need to determine:
- Types of issues you want to recognize. If you need a more granular approach, you can also create subtypes for each type. Types help categorize work to get an understanding of the kind of work that is requested of your team.
- Levels of priorities and severities to define the impact that incoming work has on end users and to assist in prioritization.
For this tutorial, suppose you've decided on the following:
- Type:
Bug,Feature, andMaintenance - Priority:
1,2,3, and4 - Severity:
1,2,3, and4
For inspiration, see how we define these at GitLab:
Document your criteria
After you agree on all the criteria, write it all down somewhere your team mates can always access.
For example, add it to a wiki in your project, or your company handbook published with GitLab Pages.
Create scoped labels
DETAILS: Tier: Premium, Ultimate Offering: GitLab.com, Self-managed, GitLab Dedicated
Next, you'll create labels to add to issues to categorize them.
The best tool for this is scoped labels, which you can use to set mutually exclusive attributes.
Checking with the list of types, severities, and priorities you've assembled previously, you'll want to create matching scoped labels.
The double colon (::) in the name of a scoped label prevents two labels of the same scope being
used together.
For example, if you add the type::feature label to an issue that already has type::bug, the
previous one is removed.
NOTE: Scoped labels are available in the Premium and Ultimate tier. If you're on the Free tier, you can use regular labels instead. However, they aren't mutually exclusive.
To create each label:
- On the left sidebar, select Search or go to and find your project.
- Select Manage > Labels.
- Select New label.
- In the Title field, enter the name of the label. Start with
type::bug. - Optional. Select a color by selecting from the available colors, or enter a hex color value for a specific color in the Background color field.
- Select Create label.
Repeat these steps to create all the labels you'll need:
type::bugtype::featuretype::maintenancepriority::1priority::2priority::3priority::4severity::1severity::2severity::3severity::4
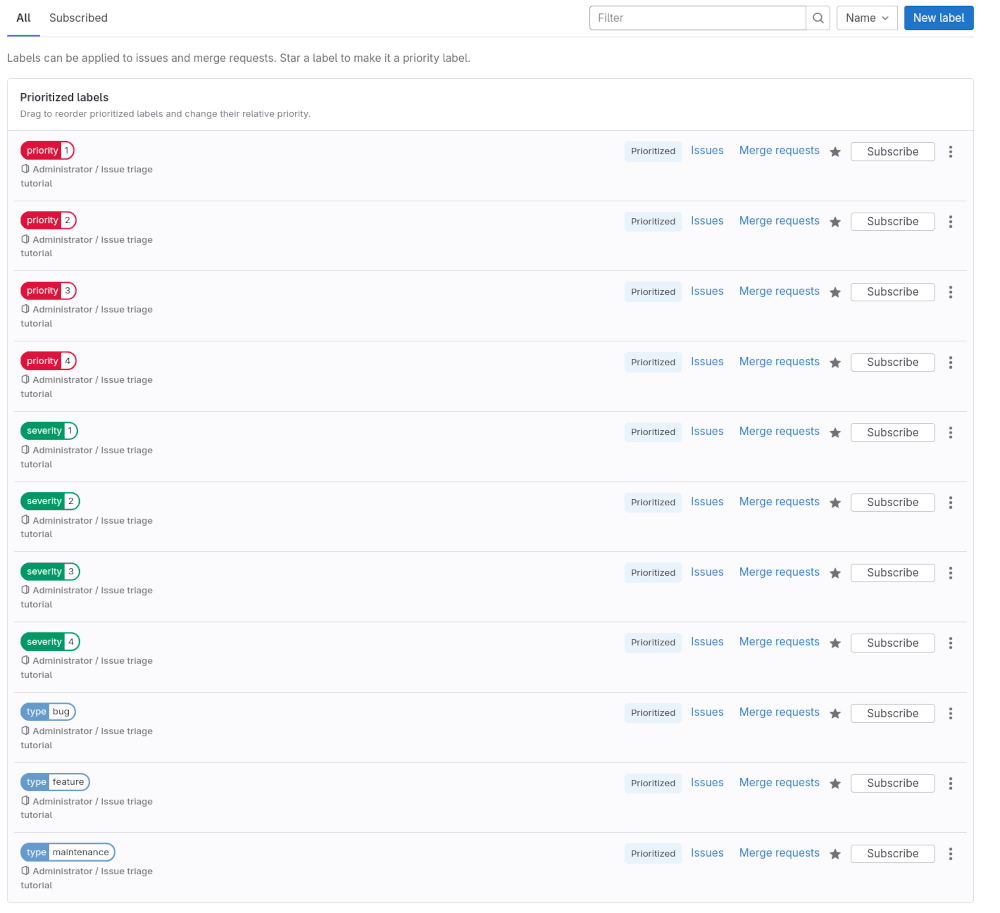
Prioritize the new labels
Now, set the new labels as priority labels, which ensures that the most important issues show on top of the issue list if you sort by priority or label priority.
To learn what happens when you sort by priority or label priority, see Sorting and ordering issue lists.
To prioritize a label:
- On the Labels page, next to a label you want to prioritize, select the star ({star-o}). This label now appears at the top of the label list, under Prioritized labels.
- To change the relative priority of these labels, drag them up and down the list. The labels higher in the list get higher priority.
- Prioritize all the labels you created previously. Make sure that labels of higher priority and severity are higher on the list than the lower values.
Create an issue triage board
To prepare for the incoming issue backlog, create an issue board that organizes issues by label. You'll use it to quickly create issues and add labels to them by dragging cards to various lists.
To set up your issue board:
- Decide on the scope of the board. For example, create one that you'll use to assign severity to issues.
- On the left sidebar, select Search or go to and find your Issue triage tutorial project.
- Select Plan > Issue boards.
- In the upper-left corner of the issue board page, select the dropdown list with the current board name.
- Select Create new board.
- In the Title field, enter
Issue triage (by severity). - Keep the Show the Open list checkbox selected and clear the Show the Closed list one.
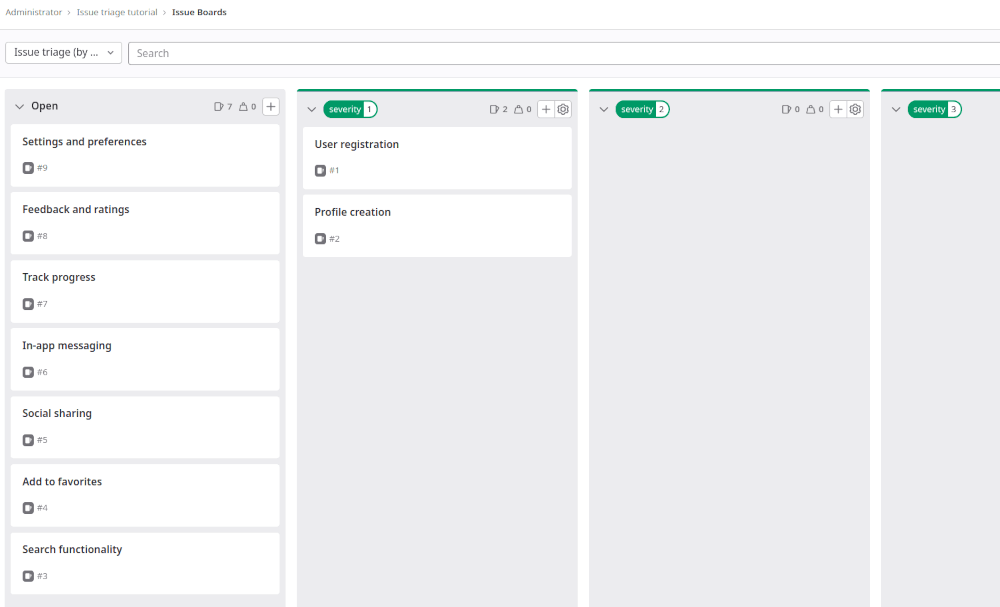
- Select Create board. You should see an empty board.
- Create a list for the
severity::1label:- In the upper-right corner of the issue board page, select Create list.
- In the column that appears, from the Value dropdown list, select the
severity::1label. - Select Add to board.
- Repeat the previous step for labels
severity::2,severity::3, andseverity::4.
For now, the lists in your board should be empty. Next, you'll populate them with some issues.
Create issues for features
To track upcoming features and bugs, you must create some issues. Issues belong in projects, but you can also create them directly from your issue board.
Start by creating some issues for planned features. You can create issues for bugs as you find them (hopefully not too many!).
To create an issue from your Issue triage (by severity) board:
-
On the Open list, select Create new issue ({plus}). The Open list shows issues that don't fit any other board list.
If you already know which severity label your issue should have, you can create it directly from that label list. Each issue created from a label list will be given that label.
-
Complete the fields:
- Under Title, enter
User registration.
- Under Title, enter
-
Select Create issue.
-
Repeat these steps to create a few more issues.
For example, if you're building an app, create the following issues:
User registrationProfile creationSearch functionalityAdd to favoritesPush notificationsSocial sharingIn-app messagingTrack progressFeedback and ratingsSettings and preferences
Your first triage issue board is ready! Try it out by dragging some issues from the Open list to one of the label lists to add one of the severity labels.
Next steps
Next, you can:
-
Tweak how you use issue boards. Some options include:
- Edit your current issue board to also have lists for priority and type labels. This way, you'll make the board wider and might require some horizontal scrolling.
- Create separate issue boards named
Issue triage (by priority)andIssue triage (by type). This way, you'll keep various types of triage work separate, but will require switching between boards. - Set up issue boards for team hand-off.
-
Browse issues by priority or severity in issue lists, filtered by each label. If it's available to you, make use of the "is one of" filter operator.
-
Break the issues down into tasks.
-
Create policies that help automate issue triage in a project with the
gitlab-triagegem. Generate summary reports with heatmaps like the following:

To learn more about issue triage at GitLab, see Issue Triage and Triage Operations.